
You probably have a dozen temperature sensors hiding in plain sight. Look at the grill in the backyard. Check the candy maker in the pantry. Flip open the medicine cabinet. They are all doing the same basic job: measuring heat. The oven uses one to stay hot. The fridge uses one to stay cold. Your furnace relies on a tiny one to decide when to kick on. Even the little digital stick in your drawer is a sensor, though it works differently than the old-school glass ones you grew up with.
This isn’t just about knowing if it’s eighty degrees outside. It’s about the mechanics of heat detection. Understanding these tools changes how you view your home’s climate control. You start seeing the physics in the walls.
We are going to strip away the digital noise. We will look at the technologies that actually exist. More importantly, we will show you how to build your own sensor from scratch. Starting with the oldest and most reliable method.
The Physics of Expansion
Bulb thermometers are not complicated. They are elegant in their simplicity. You see them in historical photos, in antique shops, and yes, in some modern medical cabinets. They rely on a single physical law: liquids expand when heated.
The device consists of three main parts. A glass bulb at the bottom. A narrow capillary tube running up the stem. And a liquid inside that responds to temperature changes. When the temperature rises, the liquid in the bulb expands. It has nowhere to go but up the tube. The higher the temperature, the higher the liquid climbs.
“Bulb thermometers rely on the predictable expansion of liquids like mercury or alcohol to indicate temperature changes.”
This seems straightforward. But getting it right requires precision. The glass must be uniform. The tube must be consistent in diameter. Any variation throws off the reading. That is why cheap versions can drift over time.
Mercury vs. Alcohol
Historically, mercury was the gold standard. It expands linearly with temperature. It stays liquid over a wide range. It conducts heat well. But it is toxic. If that glass bulb breaks in your kitchen, you have a hazardous cleanup job. You need specialized kits to handle the beads. Many countries have banned mercury thermometers for general use.
Alcohol stepped in as the safe alternative. It is dyed red or blue for visibility. It is non-toxic. It works well for everyday measurements. The trade-off? It has a narrower liquid range. It evaporates faster if the seal fails. It can leave a meniscus in the tube that makes reading difficult.
For DIY projects, alcohol is the safer choice. You can buy it at hardware stores. It is cheap. It is easy to handle. Just remember to use a food-grade or high-purity alcohol if you are building something that might touch surfaces.
Building Your Own Bulb Thermometer
You do not need a lab to make one. You need a few household items. The goal is to create a sealed system that shows expansion.
What you will need:
– A clear glass bottle or jar with a tight lid
– Clear alcohol (rubbing alcohol or ethanol)
– Food coloring (red or blue works best)
– A clear plastic straw or thin glass tube
– Modeling clay or playdough (for sealing)


Understanding the Science of Liquid Expansion
You likely recognize a bulb thermometer as that old-school glass stick you remember from school or a grandmother’s medicine cabinet. Inside, it holds a liquid—historically mercury, though modern versions use safer alternatives like alcohol or colored water. The device operates on a straightforward physical law: liquids expand when heated and contract when cooled. This is the same principle that allows a hot air balloon to rise, though gases behave slightly differently than liquids under temperature shifts.
We interact with this phenomenon daily, often without noticing. Water, milk, and cooking oil all shift in volume as their temperature changes. However, these natural expansions are so subtle they are invisible to the naked eye. Bulb thermometers solve this visibility problem through design. They feature a reservoir bulb at the bottom connected to a capillary tube that is extremely narrow. This geometry amplifies even the slightest change in volume, forcing the liquid to rise or fall visibly along the stem.
DIY Thermometer Construction
You can observe this principle firsthand by building a simple model. It requires minimal materials and basic tools. Here is what you will need for the project:
- Glass container : A jar or bottle with a screw-top lid. Glass is non-negotiable; plastic or metal lids and containers deform when squeezed, which ruins the seal and invalidates the reading. A standard 48-ounce apple juice jar works well.
- Punching tool : A power drill or a hammer and large nail.
- Sealant : Silly putty, plumber’s putty, caulk, or even chewing gum can create an airtight seal.
- Capillary tube : A drinking straw, ideally 8 to 10 inches long. Thinner straws yield more precise readings because the liquid column moves further for the same volume change. Clear plastic is preferred for visibility.
- Dye : Food coloring is optional but highly recommended for contrast against the liquid.
Step-by-Step Assembly
The construction process relies on creating an airtight system where the only escape route for the expanding liquid is up the straw.
- Create the access point : Use your drill or nail to puncture a hole in the center of the glass jar’s lid. Aim for precision. The hole should be just large enough to snugly fit the straw. A loose fit will allow air to leak in or out, breaking the seal and rendering the thermometer useless.
- Insert the sensor : Push one end of the straw through the hole from the outside in. Ensure it is straight and stable.
- Seal the integrity : Apply your chosen sealant around the base of the straw on both the interior and exterior of the lid. This step is critical. If air leaks past the straw, the internal pressure will equalize with the outside atmosphere, and the liquid will not respond to temperature changes. The seal must be airtight.
- Fill and cap : Fill the jar with water (add food coloring here if using). Screw the lid on tightly. The liquid level should rise slightly into the straw. If it doesn’t, you may need to warm the jar with your hands to expand the air inside, pushing the liquid up.
*The key to a working DIY thermometer is an airtight seal. Any leak in the
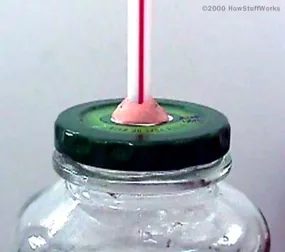

Fill a glass jar to the brim with cold water. You can chill it in the fridge overnight or use ice water poured from a pitcher, leaving the ice behind. Add a few drops of food coloring if you want visibility, then shake it up. Set the jar on a stable table. The goal is a full jar, right to the rim, without spilling.
Screw the lid on tight. As you tighten the cap, a bit of water will spill over the sides. You might even see water rising slightly in the straw. That’s fine.
Plug your kitchen sink and run hot water into it until the basin is about half full. Submerge the jar in the warm water. Watch the straw. The water inside the jar will expand and rise up the narrow tube. You are seeing thermal expansion in real time. It happens constantly, but the volume change is usually too small to notice. The straw amplifies the movement.
You have just built a simple bulb thermometer. It works. With proper calibration, it could give you fairly accurate readings. But it has flaws.
Water freezes at 32°F (0°C). It boils at 212°F (100°C). Your DIY thermometer is useless outside that range. The large glass jar also acts as a thermal insulator. It takes a long time—maybe an hour—for the water inside to match the temperature of the hot water surrounding it. Plus, the open top allows evaporation and dust to enter.
Professional thermometers fix these issues by using mercury. The bulb is tiny. It heats up and cools down almost instantly. The tube is micro-fine, making even tiny expansions visible. Mercury doesn’t freeze or boil within standard household ranges. It stays sealed, so no evaporation or debris gets in.
Calibrating Your Scale
How do you mark the temperatures? You need a reference. Two scales dominate:
Fahrenheit Scale: Daniel Fahrenheit decided to split the gap between freezing and boiling water into 180 degrees. He set freezing water at 32 degrees. He marked that level on the glass. Then he placed the thermometer in boiling water and marked that level as 212 degrees. He drew 180 even spaces between them.
Celsius Scale: Anders Celsius originally wanted freezing at 100 and boiling at 0. Later, the scale flipped. Now, freezing is 0 degrees and boiling is 100 degrees. The gap is still 100 degrees.
These scales are arbitrary choices. You could invent your own. Freezing and boiling water are just convenient because they are easy to reproduce. But nothing stops you from using a different reference point.
Bimetallic Strip Thermometers
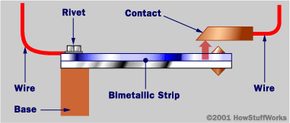
Mercury thermometers are being phased out due to toxicity. The modern alternative? The bimetallic strip. It uses two different metals bonded together. Each metal expands at a different rate when heated. When the temperature rises, the strip bends. This mechanical movement drives the needle on a dial gauge. No liquid. No glass. Just physics.

Bulb thermometers tell you the temperature with precision, but they are terrible at managing it. You can’t build a thermostat out of glass and alcohol. That’s where the bimetallic strip comes in. It’s metal. It’s tough. And it’s the reason your oven doesn’t burn your house down.
The physics are simple. Different metals expand at different rates when they heat up. Bond two dissimilar metals together, and you create a mechanical switch that can handle serious heat. You’ll find this setup everywhere from kitchen ovens to HVAC systems.
The Mechanics of Control
Imagine a strip made of two distinct layers. In an oven context, one metal (let’s call it the “fast” side) expands more rapidly than the other (the “slow” side).
As the temperature climbs, the fast metal stretches more than its partner. The strip bends. This bending action forces the strip to touch an electrical contact. The circuit closes. The heater turns off.
If you’re building or adjusting a device for a refrigerator, you reverse the logic. You want the strip to bend away from the contact as it gets colder, or ensure the specific metal combination triggers the compressor on at the right threshold. By adjusting the gap between the strip and the contact point, you dial in the exact temperature cutoff. Close the gap? It kicks on sooner. Widen it? It runs hotter before shutting off.
Coiled for Sensitivity
Straight strips work, but coiled strips are better.
If you look at a standard backyard dial thermometer, you’ll see a long bimetallic strip wound into a tight spiral. Why? Surface area and leverage. A coiled strip reacts to microscopic temperature shifts with much greater movement than a straight bar. That extra movement is what drives the needle on your dial.
Furnace thermostats use the same coiled principle. But instead of a needle, they attach a mercury switch to the end of the coil. As the coil expands or contracts with the room’s temperature, it tilts the switch. Mercury flows to one side or the other, completing or breaking the circuit that fires up the furnace. It’s an elegant, purely mechanical solution to a complex problem.
Electronic Thermometers
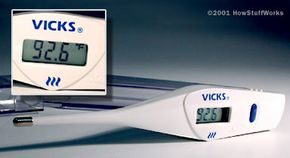

Digital temperature sensing has become the standard in modern electronics. At the heart of most of these systems is a small component called a thermistor, or thermoresistor. It is a simple device but highly effective for measuring heat.
The mechanism relies on electrical resistance. As the temperature changes, the resistance of the thermistor changes in a predictable way. A microcontroller or other circuit measures this shift in resistance. The system then converts that raw electrical data into a readable temperature value. This conversion allows the device to display the current temperature or trigger automatic responses. For instance, a thermostat might turn on heating when the reading drops below a set point.
If you want to build your own digital thermometer, the process involves connecting the thermistor to a microcontroller. You will need to code the device to interpret the resistance values. Check out How Microcontrollers Work for step-by-step instructions on building a functional digital thermometer. You can find detailed guides on wiring, coding, and calibration in those tutorials.
Understanding Digital Temperature Sensors
Thermistors are favored in DIY projects because they are inexpensive and easy to interface with common development boards like Arduino or Raspberry Pi. The key is understanding the relationship between temperature and resistance. Most modern thermistors are negative temperature coefficient (NTC) types, meaning their resistance decreases as they get hotter. This behavior allows for precise measurements across a wide range.
When working with these components, always double-check your wiring. Incorrect connections can lead to inaccurate readings or damage to the sensor. Use a multimeter to verify the initial resistance at room temperature. This baseline helps in calibrating your code for better accuracy.
Exploring Temperature Measurement Technology
Beyond basic thermistors, various technologies exist for measuring heat. For example, Galileo thermometers use density differences in liquid and glass spheres to indicate temperature. Ear thermometers rely on infrared sensors to detect heat emissions from the eardrum. Pop-up turkey timers use mechanical springs that release at specific temperatures, a different approach entirely from electronic sensing.
Home thermostats often combine thermistors with user interfaces to control HVAC systems. Air conditioners and refrigerators use similar principles to maintain internal temperatures. Understanding these systems helps in troubleshooting home appliances. If your AC isn’t cooling properly, the issue might not be the compressor but a faulty temperature sensor.
Further Resources and Safety
For more detailed information, several resources are available. The EPA provides FAQs on mercury fever thermometers, highlighting safety concerns with older devices. The USDA offers guidance on using meat thermometers for food safety. Science projects often include instructions for making simple thermometers, which is a good educational activity.
Always handle electronic components with care. Avoid touching soldered joints or exposed circuits while the device is powered. If you are working with high-voltage appliances, turn off the power supply before inspecting sensors. Safety first, especially when dealing with heat and electricity.
The evolution from mercury to digital sensors reflects broader trends in technology. We now have more accurate, safer, and more versatile tools for measuring temperature. This shift benefits both professionals and hobbyists. You can now monitor your home’s climate control with precision. Or you can track the internal temperature of your smoker for perfect BBQ results. The possibilities are limited only by your curiosity.