You don’t need a degree in electrical engineering to fix a broken kitchen appliance. Most of us have at least one food mixer gathering dust or taking up valuable counter space because it stopped working mid-mix. It’s frustrating. You bought it to make cookies, bread, or maybe just to mix up a quick salad dressing. Now it’s just heavy plastic.
Before you toss it and buy a new one, consider what’s actually happening inside. Understanding the mechanics can save you money. It also keeps non-biodegradable waste out of landfills. These machines are motorized. They don’t generate heat like a toaster; they generate motion. The motor spins. Gears translate that spin into the opposing rotation of the beaters. A speed controller adjusts the electrical current, letting you go from a gentle stir to a violent whisk.
There are two main types. Portable hand mixers have small motors for light jobs. Stand mixers have beefier motors for kneading heavy dough. The repair logic is similar for both, though access to parts varies. Here is how to tackle the three most common failures: the switch, the speed control, and the gears.
Fixing a Broken Power Switch
A dead mixer is often just a dead switch. Before you assume the motor is toast, check the simple things. Is the plug loose? Is the cord frayed? If those are fine, the switch is the next likely culprit. Switches are simple components. They fail. They stop letting current flow.
To test and replace the switch, you need a screwdriver and a continuity tester or multitester.
Step 1: Unplug the appliance. Safety first. Remove the housing around the switch. This exposes the back side of the switch. You might need to pop off a few plastic clips or remove screws. Be careful not to strip anything.
Step 2: Inspect the terminals. Ensure the wires from the appliance are fully attached. A loose wire can mimic a broken switch.
Step 3: Mark the terminal wires for position. Use a piece of tape or just take a photo. You need to know exactly where each wire goes back. Disconnect them.
Step 4: Use your continuity tester. Touch the probes to the switch terminals. Flip the switch. If the tester doesn’t beep or show a reading, the switch is faulty. Replace it. Reconnect the wires to the new switch exactly as they were. If the tester shows continuity, the switch is likely fine, and the problem lies elsewhere.
Adjusting or Replacing Speed Controls
Speed controls vary by mixer type. Hand mixers often use a speed switch with multiple electrical contacts. Each contact adds current to the motor, increasing speed. Stand mixers might use a variable resistor to dial in the power.
In either case, a continuity tester or multitester is your best friend here. It helps you determine if the controller is actually sending power to the motor at different settings. Sometimes, the contacts just need cleaning. Oxidation can build up, blocking the current. You can gently clean the contacts with contact cleaner or fine sandpaper. It’s a low-cost fix.
However, if the variable resistor is burnt out or the switch contacts are melted, cleaning won’t help. You’ll need to replace the entire controller assembly. It’s more expensive than a switch, but it’s still cheaper than buying a new mixer.
“Problems caused by speed controls can only be solved by replacing the controller in many cases. Cleaning helps if the issue is surface oxidation, not internal failure.”
Servicing the Gears
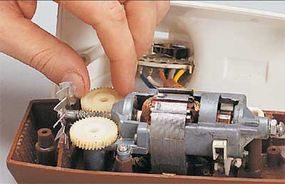
The gears are the heart of the mixer’s physical movement. They take the motor’s rotation and turn it into the opposing motion of the beaters. In most models, a worm gear attached to the motor shaft turns two or more pinion gears. The pinion gears then rotate the beaters.
Gears aren’t electrical. They are physical. They wear down. They strip. They get dry. If your mixer is making a grinding noise or the beaters aren’t turning smoothly, the gears are likely the issue.
Step 1: Unplug the appliance. Always.
Step 2: Remove the upper housing. This exposes the gears. You may need to remove the beater shaft first. Look for obvious damage. Cracked plastic? Stripped teeth?
Step 3: Inspect and lubricate. Use a food-safe lubricant. Apply it to the worm gear and the pinion gears. Be careful. Excess lubricant can drip onto the motor or electrical components. That creates a new problem. Wipe away any excess.
If the gears are stripped, lubrication won’t fix them. You’ll need to replace the gear set. It’s a bit more involved, but it restores the mixer’s core function.
Final Thoughts
Repairing a food mixer isn’t about being an electrician. It’s about patience and observation. Check the switch. Check the speed control. Check the gears. Often, the fix is simple. Sometimes it’s not. But you’ll know why it stopped working. That knowledge is worth more than just having another working mixer. You might even start looking at other appliances with this same mindset. The next broken toaster or blender might not be so scary.

Clear Debris and Check the Fuse First
Before you put anything back together, you need to make sure the interior is clean. Use a brush or compressed air to remove any loose shavings or plastic pieces from the housing. If you skip this, debris can interfere with moving parts or cause shorts later.
When the food mixer’s motor doesn’t operate, a blown fuse is often the culprit. Testing and replacing a fuse is a straightforward process, but it requires getting inside the unit.
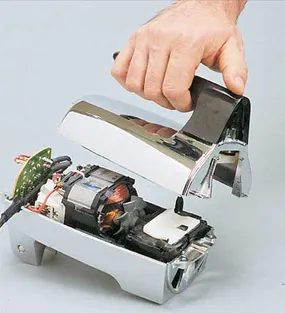
Step 1: Remove the upper housing to gain direct access to the motor and internal components.
Step 2: Locate the fuse and disconnect it from the motor terminals.
Step 3: Place a continuity tester or a multimeter probe at each end of the fuse. If there is no continuity, the fuse is blown. You must replace it with one of the exact same amperage rating. Using a higher-rated fuse is dangerous.
Step 4: Since the fuse’s purpose is to save the motor from electrical damage, you need to check the speed controller and other electrical components in the appliance to determine the cause. If you don’t find the root problem, the new fuse will blow as soon as you turn the motor back on.
When to Replace the Motor
If a small appliance is properly designed, the motor should be one of the last components to fail. It is also one of the last components to check.
Unless you have the proper tools, you should replace the motor rather than attempt to repair it. Or you can take the motor to a professional service person for repair.
To test and replace a motor:
Step 1: Test the motor for continuity as you would any other electrical component.
Step 2: If it fails the test, mark and remove wires attached to it and disconnect the motor from the housing.

Sizing Your Replacement Motor
Don’t guess. You need an exact match.
Check the dimensions. Check the voltage. Check the amperage.
If the new motor doesn’t fit the housing, you’re wasting time. If the rating is off, you risk burning out the circuit or just not getting the power you need. Precision matters here. One wrong measurement and the whole job fails.
Once you have that sorted, you can actually fix the appliance. Or you can toss it.
Speaking of toss-worthy, what about the blender in your kitchen? When those blades stop spinning, it’s usually a quick fix or a death sentence. Check the next section for the breakdown on blender repair.
Diagnosing Food Mixer Failures
Food mixers are simple machines. Too simple sometimes.
They break.
Gears slip. Motors die. Wires fray. The list of reasons is long. You might hear a grind. Or silence.
Don’t panic.
There is a chart designed to help you figure out exactly what’s wrong. It walks you through the symptoms.
- Does it hum but not turn?
- Does it smell like burning plastic?
- Is there a loose connection in the cord?
Use the chart. Follow the steps. Find the fault.
Fixing small appliances is about patience. And knowing when to stop.