Most people toss a broken hair dryer. It’s cheap to replace. Why spend twenty minutes unscrewing plastic when the store is open? But here is the thing: cheap appliances break faster. If you buy something decent, fixing it makes sense. You save money. You keep the landfill happy. And honestly, it’s not that hard.
Hair dryers are simple machines. They move air. They heat it. That’s it. If it doesn’t do one of those two things, the problem is usually mechanical, not magical.
Зміст
Understanding Hair Dryer Components and How They Work
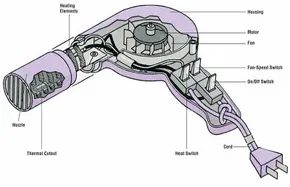
Every hair dryer looks different. Some are heavy bricks. Some are sleek sticks. Inside, they are all clones. They share the same guts.
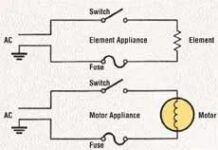
You have a fan motor. It pulls air in. You have a heating element. It glows red. Then you have the controls. The on/off switch. The fan-speed switch. The heat switch. And a safety valve called a thermal cutout.
The switches control current. The heat switch decides how much juice goes to the heating coil. The fan switch decides how fast the motor spins. The thermal cutout is the bouncer. If things get too hot, it kicks the heating element out of the party. It shuts off power to prevent fires.
How to Fix Common Hair Dryer Problems
You can fix most issues yourself. The big ones are switches, fans, heating elements, and thermal cutouts. Let’s start with the switches. They all work the same way. They open or close a circuit.
Testing and Replacing Hair Dryer Switches
Switches fail. They get grimy. They wear out. Whether it’s a two-position on/off toggle or a three-way heat selector, the test is the same.
First, safety. Unplug the dryer. Seriously. Don’t skip this.
Next, open it up. Unscrew the housing. The screws are usually hidden. Look near the motor vent. They are recessed. You might need a small Phillips head.
Once the case is off, find the switch. It’s mounted in the handle or the main body. It sits between the cord and the motor or heating coil. Disconnect it.
Grab a multimeter. Set it to continuity. Touch the probes to the switch terminals.
- On/Off Switch: In the OFF position, the light should stay off. Open circuit. Flip to ON. The light should turn on. Closed circuit. If it stays dead or stays on, the switch is trash.
- Variable Switches: Fan-speed and heat switches should show continuity in all settings. If one position fails, replace the whole switch.
Cleaning the Hair Dryer Fan Intake
The fan pulls air in. It pushes it out the nozzle. The motor drives it.
Hair dryers are durable. The fans rarely break. The problem is what gets inside. Hair. Lint. Moisture. Bathrooms are humid. Lint loves humidity.
Check the intake screen. It’s usually near the handle. If it’s clogged, air can’t get in. The motor overheats. The dryer shuts down.
Use compressed air. Blow the lint out. Or use a soft-bristle toothbrush. Gently scrub the mesh. Don’t force it. You don’t want to bend the screen.
If the fan spins but the air is weak, clean the intake. If it doesn’t spin at all, the motor might be dead. Or the switch controlling it is broken. Check the switch first. It’s easier.
Most hair dryer “breaks” are just clogged filters.
Don’t disassemble the motor itself. It’s sealed. If the motor is dead, you’re buying a new dryer. But the switch? That’s a five-dollar fix. The fan screen? Free.
Start there. Before you throw it away, look at the lint. Look at the switch. Sometimes the fix is stupidly simple.
How to Test and Replace a Hair Dryer Motor
Moisture is the enemy. It shorts out components, kills the motor, and turns your styling tool into a paperweight. Before you toss it, check the internals.
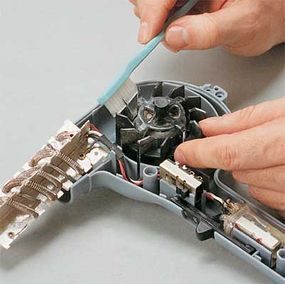
Grab a screwdriver. Remove the housing screws and lift off the casing. You’ll see the fan blades. Inspect them. Bent? Clean them. Broken? Swap them out. It’s a cheap fix if you have spare parts.
Now for the motor. You need a continuity tester. Touch the probes to the motor terminals. Does the light come on? Good. Current flows. The path is closed. No light? The motor is dead.
Replace it. But here’s the catch. You need an identical rating. Same watts. Same physical size. Hair dryer motors are specific. Off-the-shelf replacements are rare.
Check the price. If the motor costs more than half the price of a new hair dryer, stop. Buy a new dryer. It saves time and frustration.
Don’t overpay for a part that’s harder to find than the appliance itself.
Why Your Hair Dryer Blows Cold Air
The fan works. No heat comes out. The problem is the heating element.
It’s a high-resistance wire wound around a nonconducting frame. Situated in the nozzle or output vent. Electricity hits it, it gets hot. The fan pushes air over it. That’s the basic science.
To test it:
- Remove the housing and the element shield.
- Locate the two wires leading to the element. Look for breaks. Check for debris.
- Use a multitester or continuity tester. Check the circuit between the two lead wires.
The light should turn on. Closed circuit means the wire is intact. No light? The element is broken.
Before you buy a new element, check the thermal cutout. Sometimes the safety switch trips while the element is fine.
If the cutout works and the element fails, replace the element. Use an exact match. No improvisation.
Servicing the Thermal Cutout
Most hair dryers have a bimetallic thermostat inside the element assembly. Its job is simple. Shut off power if the dryer gets too hot. It prevents fires.
Sometimes it gets dirty. Sometimes it sticks.
Open the housing. Find the cutout. Look for discoloration or distortion. Signs of overheating.
Clean the contact points. Use emery paper. Gently.
Use compressed air to loosen debris. Hold the nozzle at a distance. Too close and you’ll damage the sensitive element wires. A few short blasts are enough.
Is it worth fixing?
For a $20 plastic hair dryer? Maybe not. For a $150 professional tool? Absolutely.
Small appliances die for stupid reasons. Loose wires. Burned elements. Stuck switches. You don’t need an electrician. You need a screwdriver and a multimeter.
Check the continuity. Swap the part. Or buy new.
Either way, you keep control. And you avoid throwing away perfectly good electronics because one $3 component failed.